Hicks House

From Builder Basic to Beautiful


7 Comments

Guest Room Beginings

As someone whose parents and siblings like over two hours away I was really looking forward to having a designated guest room in our house.  The distance isn’t so far that visiting is difficult, however a 4-5 hour round trip isn’t really something anyone wants to do in a day.  I constantly felt guilty when my parents would come up to visit and either day-tripped it due to our lack of space or sucked it up and slept on the blow up mattress on our condo’s living room floor. (not fun)

Luckily we had the spare mattress and metal frame in storage in our condo garage leftover from when we replaced our own mattress.  We decided not to throw it away so when we finally bought a house we wouldn’t have to buy a new guest mattress – I know we’re planners.

What we didn’t have was linens for the guest room (not any I liked anyway).

The Centsational Girl had posted about her daughters navy and coral bedroom last year and I absolutely fell IN LOVE with the bed spread

gray-walls-trellis-linens-cg

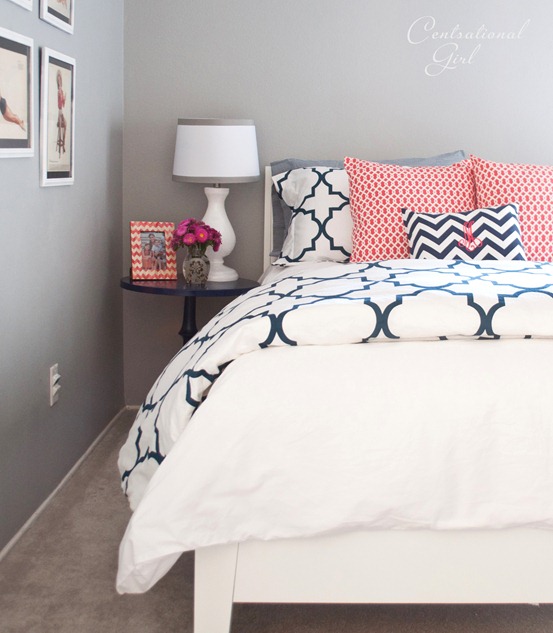
The coral is a little too girly for us since this is a cohabiting household after all… But the bedding I had to have. So this is where we stand:

Ready for guests!

Ready for guests!

There is a master plan for the room. We couldn’t decide if we wanted to use yellow or light blue as an accent color so I think we are going to do both which will give us the ability to switch it up. Maybe yellow for fall and winter to brighten up the room and light blue for spring and summer? I’ve bought all the accent fabric to make throw pillows to add to the bed – hopefully coming soon.

The accent colors will also be mirrored in the curtains. We have some short white linen linen like curtains and had the idea to sew a piece of velcro on the bottom so that we can add swappable colored panels to make them full length. This is a really cool project I’m excited about getting to at some point.

For extra furnishings I plan to refinish an old mid-century modern dresser that was left behind in our condo attic. A couple coats of white spray paint and it should look more in line with the overall feel of the room. Nightstands are also needed. Someday I’d also like to try to tackle those awesome upholstered headboards I see online and obviously some wall color – something neutral but more fun than the drab off white thats there now.

So that’s it – nothing to brag about yet, but a step up from an air mattress on the floor. What do you think?


9 Comments

Mount it Up

Perhaps one of the best things about owning your own home is the ability to be able to put holes in the wall whenever you want.  Be it to hang a beloved photograph or to mount that gigantic 55″ TV.

When we originally toured our home, one of the features we fell in love with was the great open floor plan on the first floor.  The entire back of the house is one big room – the kitchen flows right into the formal living room that ends in a gas fireplace.  The builder thinking he was super smart and doing the future home-owners a favor wired over the fireplace for cable.

This would have been the ideal option if the  living room was large enough to hold more than a loveseat and there wasn’t a much bigger room right off of the formal living room that would make a great more casual and comfortable family room.  Only problem is this bigger room was not wired… Uh-Oh.

Don’t worry, I’m married to super handy man who added extra wiring to the garage, he can totally run a wire up from the basement through the wall in the family room right?

Since we were both dead set on not only having the TV in this room, but having it mounted to the wall with no visible wires that is just what Ken did.  There was a little bit of anxiety on both our parts when the hole for the new recessed outlet to go behind the TV was cut.

This is the first hole we put in our brand new walls!

This is the first hole we put in our brand new walls!

The blue painters tape was used to visualize where the TV would be to ensure that the mount and big giant hole were in the correct spot. The wires were run up from the basement in between the wall studs and up through that hole and connected to a new recessed outlet so the TV could sit flush against the wall without worrying about the plug sticking out.

The rest of the mount assembly was added

The rest of the mount assembly was added

It was a lot more complicated than this picture suggests. One – it’s really heavy and takes two hands to hold. Two – If you’re lucky enough to have a third hand, you need to have double jointed fingers in order to grab and turn the screws properly.

Once it all completed we got nervous.  What if we did it wrong?  What if it doesn’t hold the TV right and it comes crashing down off the wall and crushes us as we’re walking by?  A test was needed.  The package said the mount should be able to hold up to 155lbs, now assuming it was all installed properly that is much more than the TV which we guestimate at 35 – 50lbs.  So what weighs more than 50lbs but less than 155lb…?

Me

Me

Seemed to hold me just fine, so up it will go!