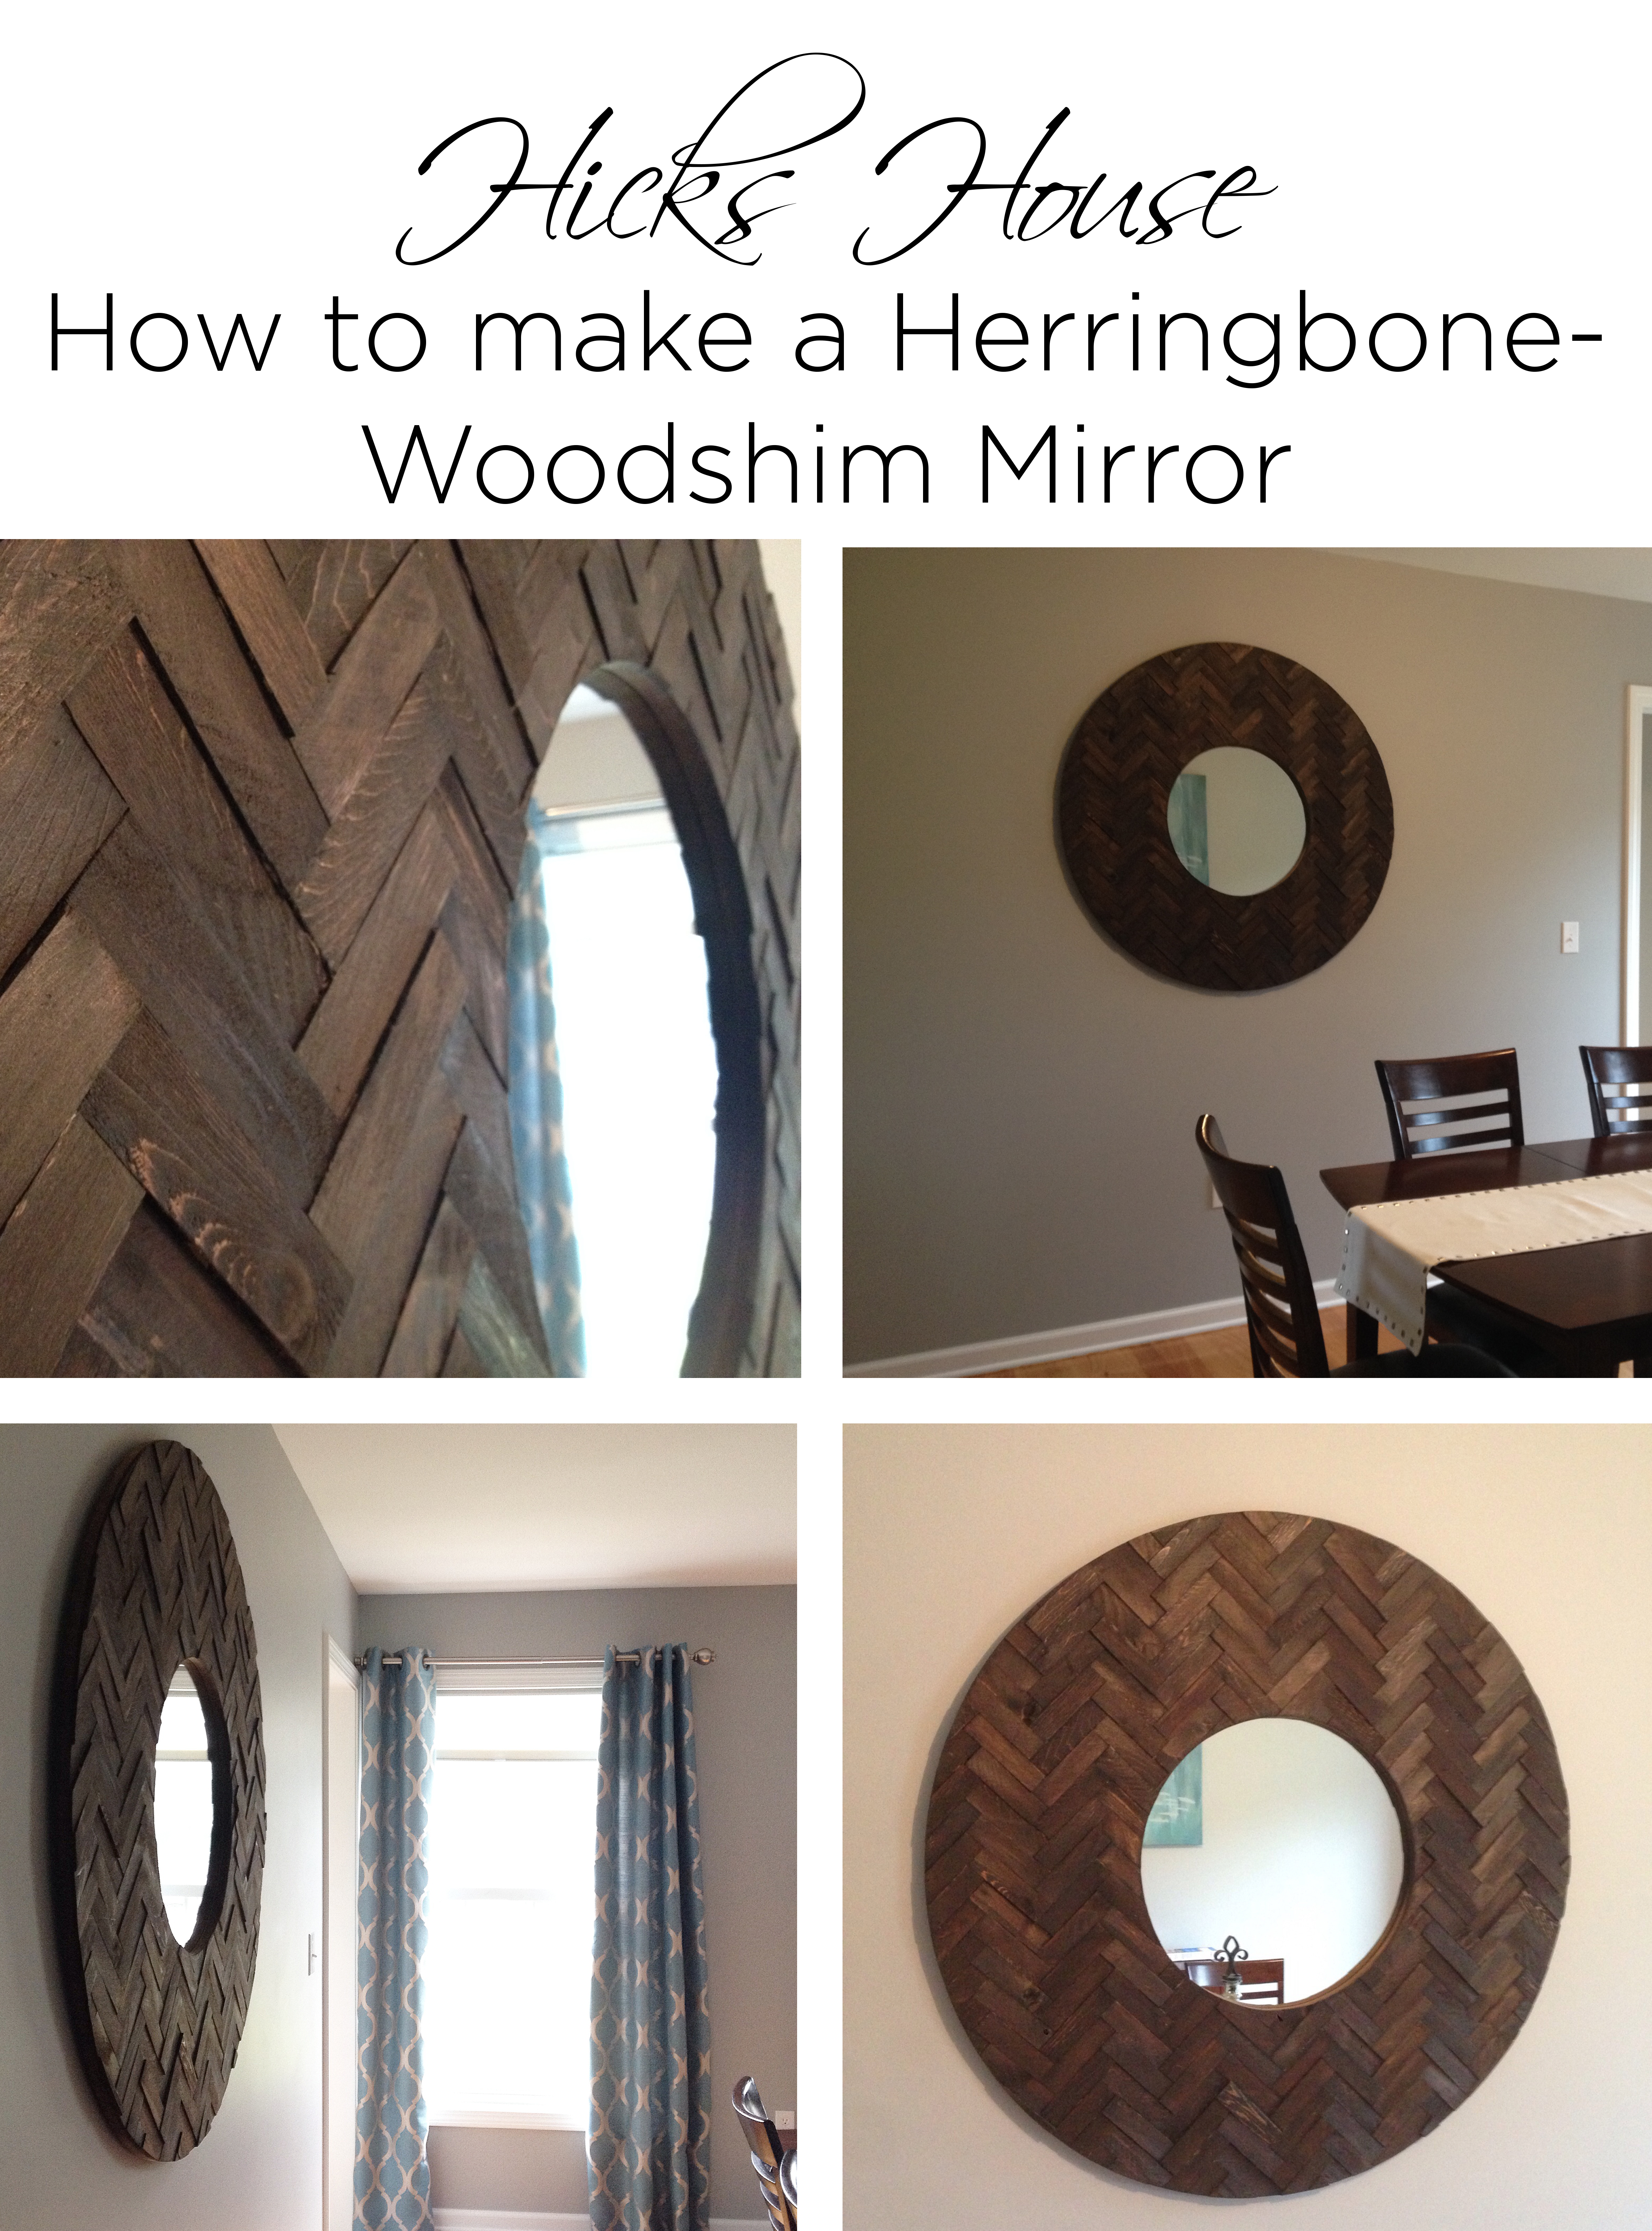
 Finally! More than a year after starting my own blog, I have completed the project that originally inspired me write about our home journey and diy our own touches. Allison over at House of Hepworths originally made her own woodshim mirror back in March of 2013. An idea she originally got from Addicted 2 Decorating and their tutorial. I of course had to put my own spin on it. While I loved the idea of the mirror, I wanted my shims to be laid out in a different pattern. I’d been envisioning it in an awesome herringbone pattern – admittedly a much harder pattern than the square pattern Allison and Kristi used. (what can I say, I’m a glutton for punishment). And so began my longest DIY project to date. In order to not overwhelm this post (or crash your browser window) with the bazillion photos I took of this process over the last three months I’ve organized most of them into collages. Step one was to buy all of the materials. We purchased
- three packs of cedar wood shims
- a 4×4 square of 1/2 inch MDF board (we wanted our finished mirror to be 3.5 feet in diameter
- and 3 tubes of liquid nails
- IKEA KOLJA mirror
We figured out that if we cut the shims to 5 3/4 inches each we would have less shim waste, so Ken set up a jig on his saw to ensure all his cuts were the same and got to chopping all the shims. Some had quite a bit of splintering happening on the ends so gave those a quick pass with hand sanding block. 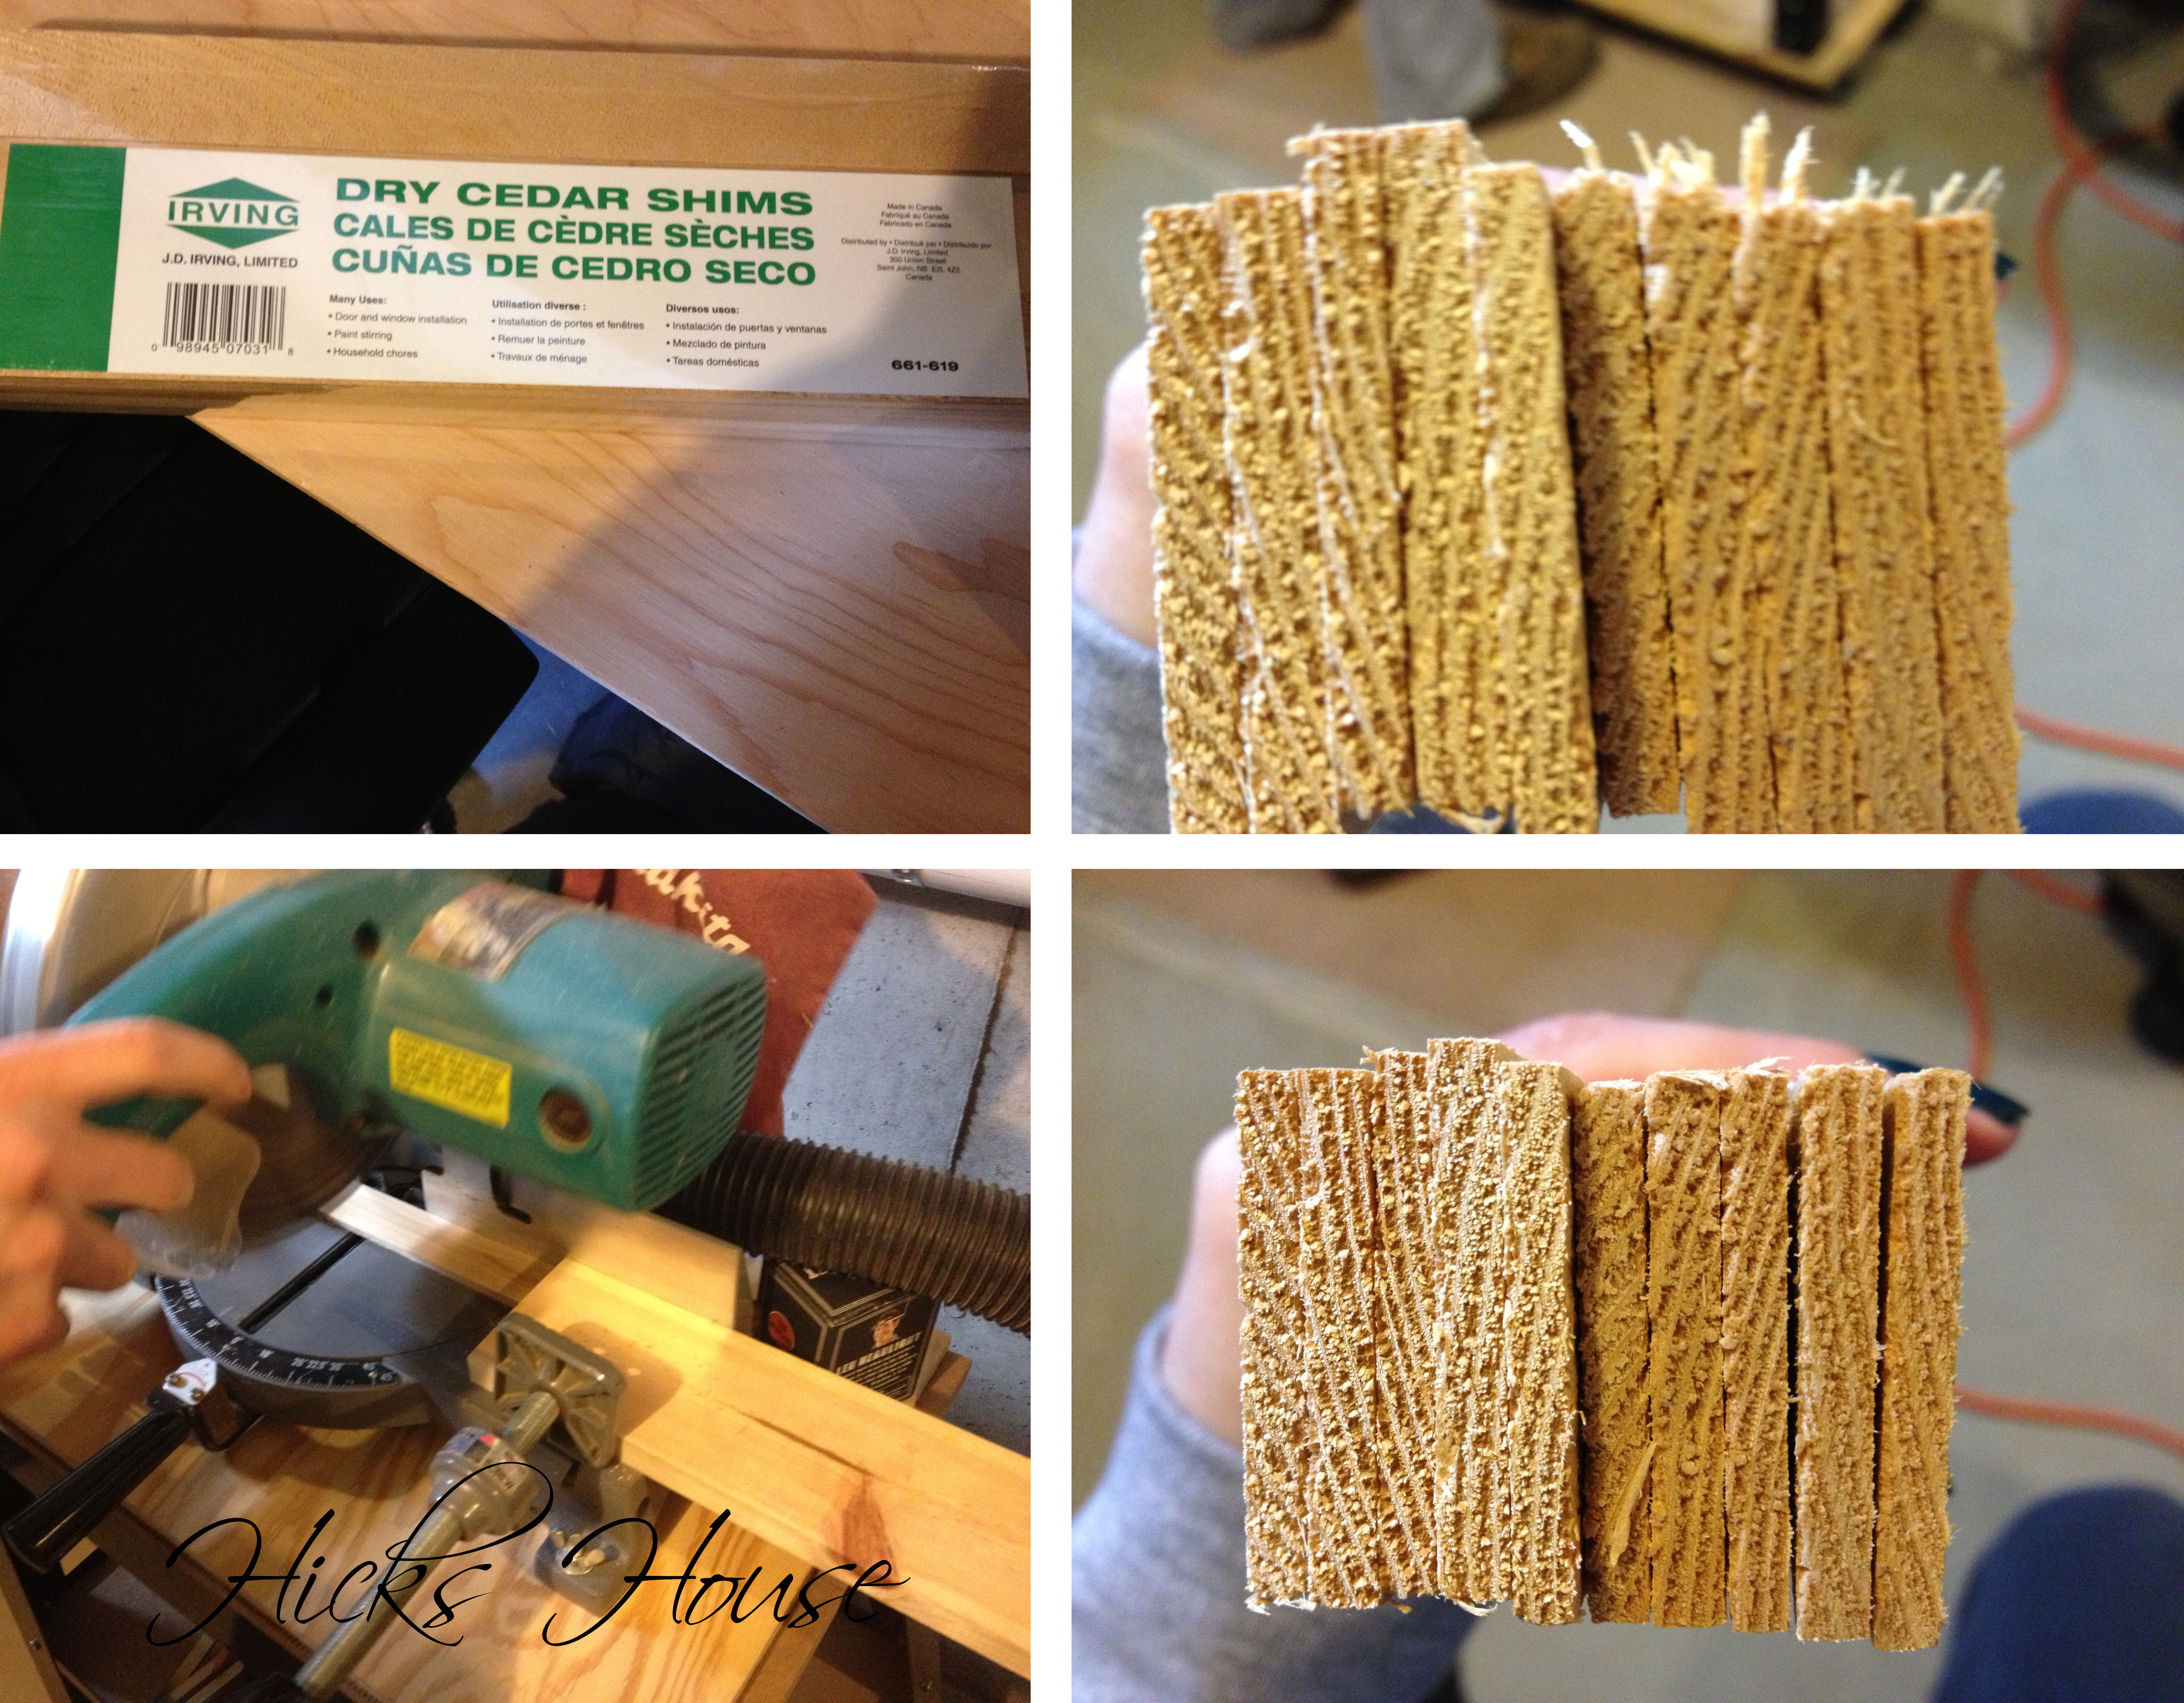 What we ended up with was a big ole pile o’ shims.
  We then placed our MDF board on top of two sawhorses to create a sort of work table. We found the center of the board and drew an X. To make sure we had enough shims and that the pattern was working properly I laid them all out dry until the entire surface was covered. I then picked up the middle pieces so that Ken could drill a hole in the center that could later be used as an entry point for the jigsaw. (In retrospect this could have been done before the dry fit – but I was too excited to get started I couldn’t wait). I then picked the pieces up one by one, applied a good amount of Liquid Nails to the back of each piece and spread it out with an extra piece of shim and carefully put them back.
  After getting into a bit of a rhythm I found it easier to pick up two pieces at a time so that I only had to worry about butting it up to one side of shim. I worked from the center up then down in one row, then off to each side. Disclaimer: This part really sucks. If you are off even the teensiest amount it will throw each additional piece off that amount times 2 and when you get to the edge nothing will fit right. Go SLOW and line everything up. Don’t worry you can do it. The glue doesn’t adhere fully right away so if you happen to stick a piece wrong you can pull it up and try again. Try to be careful of getting glue on the side or top of any of the shims. If you plan on staining this later on the stain will not adhere to the glue. (This is an example of do as I say not as I do mmmkay?) I then let it dry for
 48 hours 2 weeks. When we decided it was sufficiently dry we used the ole pen and string method to draw our inner and outer circles. The mirror had a diameter of 22 inches so we decided our inner circle would be 18 inches and hoped that was enough overlap to later attach the mirror from the back. As mentioned earlier our outer circle was 3.5 feet. and Ken used his brand new Jigsaw to cut along the lines we drew.  I deliberated and wavered back and forth between painting and staining because I was starting to get nervous that it was going to look too Country and that wasn’t what I wanted. Eventually I threw out the idea of painting it metallic silver (although I still think that would have looked cool too) and went to town staining the whole thing a dark espresso. I started with the cheap paint brush shown in the photo below and quickly swapped out for a foam brush (sorry not pictured). I worked in sections letting it sit on the wood for about 5-10 minutes then wiping it off with a clean white rag. The MDF edges SOAKED up the stain and I had to continuously dab on at least 5 coats, with no wiping to get a similar color to the top.
  Just to be safe I let this dry for a couple of weeks too. These things shouldn’t be rushed. We then flipped it upside down and drew some marks 22 inches from the center to line our mirror up at. We propped the mirror up on some paint cans topped with cardboard -to not harm the fabulous stain job- and squeezed on a bunch more Liquid Nails in a circle trying not to get too close to the opening (don’t want glue oozing out the middle) and spread it out. Ken then very very carefully put one hand through the middle (hence the propped-upness) and lowered the mirror down. This was super nerve wracking because you essentially have only one shot at this step. One it was down we carefully took it off the paint cans, placed it back on the sawhorses and put a bunch of cans on top to press it firmly into the mirror frame. We also applied a security edge of Liquid Nails around the edge as it had a slight bevel to it.
  At this point we were getting pretty excited and really wanted the mirror finished and hung on the wall. so of course it actually did take several days to dry. After we adhered the mirror, we read the side of the Liquid Nails bottle – you know always best to read the instructions after you’re done – and it said “not for use on mirrors” uh oh. So of course I was panicking that it wouldn’t hold and we would get it mounted on the wall and the mirror would detach from the frame and come crashing down while we had company over or were sleeping and shatter EVERYWHERE. So we decided to take precautionary measures. We bough some metal mirror clips from Home Depot which seemed like the perfect solution,except they were slightly too high. In order to get them to fit Ken slammed them with a hammer and used pliers to bend them into shape. Perfecto!
  Then of course the next crisis – nothing ever is easy. The screws that came with the mirror clips were too long, so we bought 1/2 inch screws and just to be safe used a scrap piece of wood to test it out. Ken measured the screw against his drill bit and wrapped some masking tape around it to create a “poor man’s drill stop” to ensure the pre-drilled screw holes were not too deep. He them pre-drilled the holes and HAND SCREWED in the screws. This is very important, do not use a drill because it would be too powerful for the MDF and could weaken it or cause splinters. The test piece held up well and didn’t pierce through to the other side so we repeated the process on the actual mirror, attaching one clip at the top and two on the bottom.
  The next dilemma was how to hang this beast, it easily weighs 20-30lbs. We purchased some heavy-duty D-rings and used the same 1/2 inch screws, pre-drill, hand screw method to attach them to the top of the mirror.
  In the picture hanging section at Home Depot we found these Monkey Hooks, we liked it because it made only a small hole in the wall and was rated to hold up to 50 pounds. Since we had some extra drywall in the basement we tried them out and took this picture that shows how they are able to support so much weight. It goes in your wall and hooks around to rest on the drywall behind the wall.
  We went upstairs to the dining room, measured out where we wanted the mirror, placed the hooks in the wall to line up with our D-rings and TA-DA its all done!
  So what do you think? I’m in LOVE. I am actually surprised how much I like the way the stain picked up the different tones of wood and think it plays well against the more contemporary elements of the dining room, not too Country at all! What do you think? I’d love to hear your opinions and if you’re planning on tackling any projects like this yourself. Just scroll ALL the way down to the bottom and leave it in the comments. (I’ve tried various things and cannot get this to move up, the field I was adding before was sending me emails instead of creating comments.) So thus concludes the longest post and project to date! Thanks for following along!